Tampilkan postingan dengan label Terrain. Tampilkan semua postingan

Sabtu, 21 Februari 2015

Cheap Sunken Terrain Board - Dock/Canal/Lava Pit (10mm/15mm/28mm)

Here's my latest quick terrain project.  Again, the aim is:

-Cheap, quick and easy to make
-Convenient to set up and to store

This is not an elaborate modelling project - there are plenty of blogs that do amazing scenic diorama-like boards.  This is for those of us who want to make the whole table in an afternoon, not spend the entire weekend adding rust effects to a doorknob.

Inspired by some of the interesting and varied Dropzone Commander scenarios, I wanted a board with sunken features  that could do service in a range of roles/genres (canal, river, chasm, lava pit, trench).  I plan to use it for 10mm, 15mm and 28mm.

I started with my usual 120x90cm (4x3ft) 5mm MDF. It's glorified cardboard - but cheap, light and surprisingly durable (I've got 4+ year old MDF tables).  I always use glue to seal the sides in case I want to use it for a sand table.

I've got some cheap and nasty 3mm MDF which I've cut 120x40cm. I nail some pine strips to the underside to support it and serve as the canal "wall".  You can see the board on the right (which I've flipped upside down).  

There is now a 10cm wide canal down the middle of the table.  It's about 5cm deep.

I had plenty left over so I made some 55cm x 40cm sections for a T-junction.

Then a few jetties to make it useful as a dockyard.

Here it is, combined with the block terrain I made last weekend.  I'll make better bridges when I get around to making interior stuff like doors, tables and beds. I'll simply swap the green cloth for a red one (lava) or black (chasm) or blue (ocean) as needed.  

1 x Grey primer spray paint $3
2 x 2.7m pine strips (42x11mm) $10
1 x 5mm MDF 90x120cm $10
2 x 3mm MDF 90x120cm $10
Total Cost $33

Total Time 90 minutes (including breaks to safely redirect an interested toddler)

So why bother do a "how to" of such simple terrain?
I find the super-realistic terrain diorama blogs a tad intimidating - I look at them and go "I don't have 500 hours and $300 to make that - even if I had the skill"   It's a bit like looking at Angel Giraldez studio-painted Infinity models - though lovely it actually discourages me from getting my own paints out as it sets a 'benchmark' which I know I can never achieve. I admire, but it doesn't actually inspire.

I found the how-to articles of rough and ready terrain, and realistic paintjobs in the hobby magazine Battle Games of Middle Earth actually made me want to paint and make stuff.   That's kinda the niche I'm aiming for. By showing my speedy, el cheapo terrain I'm hoping I'll inspire someone to actually go out and do it better. 

Sabtu, 14 Februari 2015

Fast, Cheap Wargames Terrain for 28mm/15mm - Dungeon/Bunker/Space Ship with Wooden Blocks

I've been puzzling lately about how to best store my terrain. With terrain, I tend to be prioritize:

*Easy to make
*Fast to make
*Easy to store
*Cheap (postage is a killer if you live in Australia, necessitating mostly DIY terrain)
*Looks unified (i.e. complete table 'goes' together, no 40K gothic ruins and WW2 buildings together)

I don't pretend to be a great modeller, so "looks good" and "lots of detail" doesn't really rate on the scale.  If you're a painstaking modeller who likes model-railroad level detail, there are plenty of great blogs out there, by very talented people.  This is about terrain for the rest of us - the low skilled, time poor dads. I don't want to make a single building in an afternoon, I want to make the whole table.

My daughter can cover an entire lounge room floor with her blocks (aka landmines for bare feet) - so surely mine could fill a 4x4' table?
I've tried a few things so far:
Card terrain ($50 for 4x4') usually can't be re-folded which means there is no space savings.
Terraclips ($70 for 4x4') do break down well, but then they take forever to assemble.
Foam terrain ($7 for 4x4') is very cheap, but bulky to store.  It's easy to fix/replace though. 
MDF terrain ($200+ for 4x4') looks good, but is difficult to store and is surprisingly pricey
Forests ($18 for 4x4') are bulky to store, unless you spend lots of time making special bases.
Foamboard buildings ($70 for 4x4') is easy to work with, but very bulky to store
Resin is not even remotely affordable in Australia (postage is ridiculous for anything beyond 6mm scale)

The entire box stores in an area about the size of a single terrain feature or building....

The idea
After tidying up my daughter's blocks, I was surprised how much a single box of blocks spread around.  Given the high cost of laser-cut MDF, I wondered what I could do with my humble bench saw.  My only criteria: I had to be able to fit it in a small A4-size box, and quickly set it up. 

As luck would have it, I had some leftover 42x11mm pine strips from lining my shed.  Two hours  later, I had 16 x 5cm, 16 x 10cm, 16 x 20cm, and 8 x 30cm walls, hastily sprayed a neutral grey (to serve as both spaceships and dungeons/castles/bunker complexes).

Equipment: 2 x 2.7m 42x11mm pine strips $10, 1 x grey primer spray can $3 = $13 total
Time: 2 hours


In hindsight, I'd have made less 20cm and 30cm lengths, and more 5cm and 10cm lengths. The shorter walls are far more versatile.

Obviously this could be dressed up a lot by interior detail. I've got a few ideas for doors I'd like to try.
There are some cool Hirst Arts molds with interesting interior bits and bobs. I've got some furniture from Antenociti's workshop which will also jazz it up.  

The free-standing walls are relatively stable, and resist the occasional jostle and bump, but might not be ideal in a high traffic situation. 

It's 1948 and the WW2 still rages.  British Tommies hunt ghouls under the bunkers in Gibralter.  

I also found I needed more smaller (5cm and 10cm) pieces and struggled to find a use for all the longer 30cm pieces. I'll probably make at least 8 more of each of the smaller ones.

Finally, whilst I used 42mm x 11mm pine (as that's what I had at hand), in hindsight I'd probably go 50mm+ for taller walls - simply to make sure larger models don't destroy immersion by peeking over the top.
 It's very plain, but the 3D nature still makes it better than say, D&D or Space Hulk tiles.  Some interior details (desks, beds, control panels, doors) should dress it up a bit. 
It's a fair result for the minimal time/cost involved.

It was so fast to make, I may start another project this weekend - which is to make a table that allows sunken features (trenches, rivers, ravines, canals, lava pits) whilst remaining cheap and easy to make. 

Selasa, 03 Februari 2015

"Dollhouse"-style Vertical Terrain?

I tend to make terrain by the quick and nasty method, so my problem is not making it, but storing it - even my small 4x4' tables of terrain take up significant amounts of space.  This is especially so of 28mm, and is a good argument in favour of 15mm, which takes a fraction (maybe 1/5th?) of the space.

Anyway, as an apartment dweller in my bachelor years, I know the solution to "not enough room" is often to go vertical.    I was looking at one of my daughter's dollhouses today and wondered "why don't we have more vertical wargames terrain?"

Usually multi-storey buildings work on a layer-cake principle (i..e lift off the roof to reveal minis on ground floor etc) but what if the building WAS the entire table?

This waist-high book cupboard (which I told my wife I was removing to "make more space in the bedroom") might make a solid framework. 28mm minis added for scale.

Obviously, it applies to more to skirmish games, but if you had removable interior "pieces" rather like a dollhouse, and a neutral interior paint scheme (grey?) it might be able to do service for a few genres - as a Resident Evil-style undergound bunker, a space station, a sealab, a Bavarian  mountain retreat.  At a pinch, it might be able to serve two scales (28mm and 15mm).

Anyway, I "liberated" small bookshelf which might make an easy start to a project.  I might remove the back wall to improve accessibility, and I'm thinking adding a few more "levels" with generous ceiling heights to allow me to reach in.  I could make the levels removable to increase configuration options.

 The cupboard is small and light enough to be easily lifted on a table so everything is eye height.

Moving between levels?  Movable elevator pieces whose location can be changed easily.  Maybe a few "portholes" or airlock doors (circular, so I can simply use a circular drill bit instead of having to faff about getting square cuts for doors)? 

The best thing is as long as the interior is relatively unmodified - it is still a cupboard. So I can actually store terrain in my terrain, yo.

Anyway, this is likely to be one of my whirlwind weekend projects (i.e. done in an afternoon, and damn the fine details) but I thought I'd air this scheme to my regulars for input before I start cutting and nailing.  I'm sure its been done before but my google-fu is too weak to find any similar projects. 

Terrible idea?  Good idea? Try it, fail, and let us learn from your bitter experience?

Any ideas or suggestions welcome (proviso: they do not require a lot of fiddly work: I am a famously lazy terrain maker).

Senin, 15 Desember 2014

Terrain WIP: Quick n Dirty Forest Basing

Anyone who follows this blog would know that I am not the keenest of painters.  Even lower on my list of loves is making terrain.   My three terrain criteria are:
#1. Must be unified (i.e. all looks like it belongs together, not 40K ruins + tissue boxes + painted LEGO)
#2. Must cost me almost nothing
#3. Must take me no more than a few hours to build a complete board

A railroad modeller I ain't. I also have never made a forest before (my google-fu failed to locate a good tutorial so this is going to be "seat of the pants.")  So, having put your expectations in perspective, here is my WIP forest.


Not very polished, but a decent amount of terrain for $18 and an hour or so's work.

Ingredients so far:  
3mm MDF (compressed particle board aka glorified cardboard) $4 sheet
Cheap Chinese HO/OO trees (30 for $10) i.e. 33c each (some madmen make their own, I'm told)
Sand (making my daughter a sandpit was the best thing I ever did)
Misson brown spraypaint  ($4)
PVA glue (I used a fair bit, even watered down)

Total cost $18

The trees are cheap, but a lot of the trees are really small and unusable for 28mm. Luckily I also game in 15mm and 6mm  - I knew I branched out into new scales for a reason!

Obviously I have more to go, i.e. drybrushing, adding in detail like twigs and boulders, and maybe some static grass tufts (I am hopeless at applying it and it never looks the way I want).  However it is functional at the moment (I already said I have low standards, didn't I?).

It was surprisingly quick to do.

1.  I cut the MDF out in artistic wavy blobs using a bench saw (It's Ok to do this at 11:00pm if your neighbours are ferals like mine). I sanded the edge with a detail sander.  5min/base
2.  I drilled holes in the the MDF, and pushed thumb tacks through from the bottom, and secured it with a hot glue gun.
3.  I then pushed the bases of the trees slowly onto the "spikes"created by the upwards-facing thumb tacks. I put a dab of hot glue on first, this warmed the tree trunks and made them easy to push them onto the tacks, as well as securing the tree.  3-4 minutes/base
4.  I then painted the bases using 50/50 PVA/water, and spread sand on top. (Also added walls etc) 3-4 minutes/base
5.  Spraypaint time! 30 sec (I love spraypaint)

Total time: About 15 minutes a base, or an hour and a half for the lot. Sweet!

The walls need drybrushing.  Next time, I'll spray them black and paint them separately from the base. You can see drill holes where I'm going to add some trees.
What worked:
I initially tried doing the trees last but hot glue went over everything...
Spraypainting last worked fine - obviously I did hit the tree trunks with overspray but they're brown too...

I regret:
Not handling the glue gun with more care (burns hurt)
Not painting the plaster Hirst Arts stuff BEFORE putting it on the base
Not being able to find any guides to do this properly on the interne
Having to use MDF which I know is going to warp at some stage.

I can't tell you much about the Hirst Arts buildings as my wife made them, not me. She says they were a pain in the butt as they had to have air bubbles removed from wet plaster, and the molds were so small you had to do a zillion "casts" to get enough for a building. Which is why I have ruins, not the replica of Minas Tirith I ordered ;-)

In the future:
I'll drybrush the bases with light brown, and the walls with a lighter grey
I'll glue in some fallen trees (twigs) and boulders (stones from the road) to add more detail
I'll learn to use static grass better so I'm brave enough to use it in larger clumps

I considered mounting the trees on 40mm bases and then cutting a 40mm circle in the MDF so I could remove them to better maneuver models...   ...but it would have taken longer, and have tripled my costs, given I don't own a suitable circular cutting tip for my drill.

I also am aware the thumbtacks are not perfectly flat so the bases will never sit "flat"as well as they ought - but I figure the MDF is going to warp anyway sometime in the future and I couldn't think of a better way to secure the trees. 

I admit everything is pretty basic, but this to encourage the reluctant modeller (the internet is awash with amazing modellers who can do photo realistic stuff, but in "real life" there seems to be a lot of cardboard terrain and 40K ruined corner pieces, or expensive pre-made hills - at least where I live)

Remember:  Any terrain is better than none at all!

Minggu, 07 Desember 2014

Pegasus 1:72 Log Cabins & Scottish Werewolves - Ariadna Army (Infinity the Game)

Ariadna are one of my favourite Infinity factions, with their Scottish-Soviet-French aesthetic, low tech weapons, and werewolf soldiers.

Here are some I speedpainted last night - I'm getting ready for the Infinity v3 rules.

All I know about them is the fluff (art book) is separate from the rule book, with I totally approve of.  I hope the rules will be written better (the old ones were a tad confusing, awkwardly translated from Spanish) and having all the rules in one book (instead of three) will be nice.  It's too late for them to "unmake" the million weapons and special abilities that have increasingly cluttered the game since the Human Sphere and Paradiso expansions, but maybe now I won't need to run inside to check the online wiki every 5 minutes.

I know "speedpaint" and "Infinity"are not often uttered in the same breath, but damn, the fiddly models irritate me. Wonderful dynamism, and amazing but such faint, unpaintable detail. I figured slap some paint on them and get them on the table at least, then "pretty em up" if I use the faction regularly.

Also in the pictures are some 1:72 Pegasus log cabins.  Hastily sprayed with a can of mission brown, I'm leery of showing them prominently, but I hope you will see how well they fit 28mm miniatures. At $15 for a single large cabin or 2 smalls, they make a decent hamlet for $45, and will see duty in my upcoming French-Indian war project.

At tabletop distances the 1:72 cabins look fine with 28mm minis. 

The werewolf dog-warriors (seen here in human and wolf form) are lame compared to the awesome new resculpts, but I got them on a stock clearance special.

Scottish Mormaer heavy infantry.  Infinity troops traditionally never have metallic armour, but I'm leaning towards it for my next faction. 

Some Kaplan Tactical Services mercs channeling a stormtrooper vibe.  They are intended to help out my upcoming Qapi Khalqi sectorial.  Along with the Druze, they can be used to bulk out a range of factions.

Next up, a Nomad sectorial, then probably some less frustrating minis for a change - I''m eyeing off my Perry War of the Roses plastics (lovely miniatures) and Warlord Greeks (new and shiny arrived in the mail.)


Sabtu, 10 Mei 2014

Undersea Terrain/Hellscape - Sand Tables and Expanding Foam 2.0

Just a few shots of a table that builds on a few other posts I've done in the past. It was extremely fast to build.

The new sand table is so transportable I took it outside for a game. 
"Submarine fighters" are from EM4 and cost about 30c each.
Indoor Sand Table
I like sand tables but the chance of sand escaping onto the floor stop them from being used indoors (an issue in the cold weather). You occasionally can also find sand annoyingly adhering to crevices in minis.

So I knocked up one of my 20-minute tables, and painted the bottom with a 50/50 PVA/water mix (a spraybottle would have worked better but I didn't have one to hand). 

I "liberated" the wife's flour sieve and some sand from my 1-year-olds sandpit and sprinkled it lightly over it.   After it dried I turned it over and banged off any loose sand (using the wife's dustpan to brush away any remaining crumbs - she doesn't know how much she unwittingly contributes to my projects).  Now there was no chance any sand "falling off".   I duel-wielded two spraycans over it (which also helped "seal in" the sand) and "voila" - indoor-friendly table.

The table is only 4x4.  
Random thought: The spraypainted fine sand would make decent bitumen/asphalt roads for 28mm games.
Expanding Foam - yes, you can spraypaint it
I had some leftover expanding foam cliffs from my desert table.  Someone pointed out to me that expanding foam DOES NOT melt when spraypainted like polystyrene, and they were right - it took me under 5 minutes to make the cliffs (cut, glue sand on the top and spray). I love spraypaint.

Overall it took me 20 minutes to make the table itself from MDF, 30 minutes to PVA glue sand to it and spray it black, and 2hrs for the spray-can-lid buildings and various terrain pieces. Total cost ~$40 and about ~3hours. 

What is it meant to be?
Well, the table is serving a dual role as a "hellscape" - for my Conquistadors-invade-hell skirmish game (basically, I'm borrowing the concept of Helldorado, without their expensive minis or convoluted rules). The second use is as pictured - a "undersea" board where 300-knot sub-fighters duel amongst giant kelp forests and spray-can-lid undersea bases.  

The expanding foam spraypaints fine. However it "bulges" underneath and does not sit flat.
The "kelp forests" are aquarium plants from the $2 shop and would make good alien jungles for a land game.
Undersea sub game?
I've adapted damage mechanics similar to Check Your Six but it should have more of a "WW2 PT-boats/MTBs" feel where subs sneak around slowly undetected at under 20-kts then "go loud" when attacking, engaging supercavitating rocket engines in 300-kt WW2-style dogfights. 

I hate writing down orders, so each pilot chooses 3+ action cards (turn left, shoot, climb etc) and rolls above a target number with 2D6 to see how many actions he can actually perform.  Better pilots naturally have a better chance of performing more actions but whilst 2D6 gives a predictable "bell curve"  there is no "absolute certainty" pilots will act at all - a failed roll means the sub continues to move straight ahead, simply showing the pilot did not react within the "snapshot" of time that the turn represents. 

Sabtu, 26 April 2014

Cheapest, Fastest Infinity Terrain Ever?

When experimenting with expanding foam, I realized how effective it could be for Infinity, a game that relies heavily on terrain.

*This is a complete 4x4 table of LoS-blocking terrain for $16 (2x $7 foam cans, $2 craft paint.)
 *It took only an hour to make. (excluding foam drying time)
 *It has a coherent theme.

 
 It is very cheap. 

You get plenty of foam from a can. I actually have 4 more leftover terrain pieces I'm using for another project. (It will be a lava hell-world)

Sure, it isn't the usual omgwtfthisisamazing Infinity diorama, but for someone who prefers minimum effort and cost for maximum result, I'm pretty happy with my 1-hour + $16 investment.


The "palms clumps" were Chinese H0 railroad trees from ebay. You can see the MDF coaster they are based on.

Beyond the bare minimum....
*The trees were $10 for 30 from eBay and sit on 50c MDF coasters. However it adds to the cost.
 *Obviously you could add in foamcore buildings, but the investment in time climbs sharply. 
*Drybrushing the paint on the "cliffs", and adding small scattered gravel-sized rocks would improve it a lot.
*If you want to make the board mobile, you can glue the sand to the baseboard by painting it with 50/50 PVA/water mix. 
*You could easily adapt it using white sand and grey paint for a "snow" environment. 
*The whole sand table cost me $22 and 15 minutes to make.

As you can see, plenty of line-of-sight blocking terrain makes this a solid Infinity table. It would work equally well for Heavy Gear, Tomorrow's War/Force on Force or any game that requires lots of cover.

I'd welcome ideas for other cheap, easy-to-make tables. Put a link in comments?

Quick Cheap Terrain - Expanding Foam Hills in 30 minutes

Most people use dense insulation foam (either pink or blue) for modelling but for some reason I have found it impossible to get hold of.

However, whilst in the hardware store I found some expanding sealant foam.  You know, the stuff that comes in a can for about $7.  You spray it into cracks and it swells up to 3x the size.

                                                 Ingredients: Foam can, craft paint, sand, PVA glue.

#1. I sprayed the foam into messy heaps, chuckling in an immature way (you could also make a good fake dog poop from it I think!).  It takes about 4 hours to dry.

#2. Then, I used my wife's serrated kitchen knife (after a bit of experimenting, I found this was the best cutting tool) to cut flat sections to rest the models on. I also had to cut underneath to level out "bulges" of foam that appeared under the foam lump.  This took the longest time to do.

#3. I painted the sides with a single coat of $2 acrylic craft paint (remember, don't spraypaint foam unless you want it to melt!)

#4.  The hardest bit was painting the top with PVA glue. It was pretty messy.  I sprinkled sand on top and "voila!"

You can see how the foam does not quite sit "flat" on the table.  I can pile sand up around it, but this could be an issue on a "normal" table.

A few thoughts:
The foam on the bottom of a piece "bulges"  as it dries so you have to cut it flat underneath as well.  This was a bit of a pain to cut level.  I considered using a hot wire cutter but the foam is apparently "highly flammable" and I didn't want to "gas" myself with poisonous vapours.

Obviously, a second coat/drybrush would make the painted sides look WAY better. However I was already pushing my 30 minute deadline.  

By the way, the can made double as much as what I pictured here - this was the first half I did as a "trial run."  One can of $7 foam made enough "hills" to easily fill a table, so I reckon it is good "value."

Some close-ups so you can see the finish, warts and all. Miniatures are a 15mm hovertank (GZG) and Iron Winds mecha (they stand about 15mm tall).
Obviously as second coat of paint and a drybrush in a lighter shade of brown would make it look 100% better.  However this was a quick trial run before my wife forced me to go shopping...

Here is what is looks like with 28mm models with the whole table set up. 

Jumat, 13 Desember 2013

Does 1:76 Terrain work with 28mm minis? (Pegasus Hobbies Farmhouse) + MDF Buildings - Worth their Weight in Gold?

1:76 Terrain for 28mm
Pegasus Hobbies have some cheap $10 snap-together farmhouses - a miracle in a time where everything with the word "terrain" in it doubles the price (and postage.)

I was actually pretty impressed by this kit and will be ordering more.  It snaps together really easily and holds together so well I wouldn't bother to glue it, in order to have the option to store it flat if needed. Though the roof was a little loose until I figured out how to clip it in snugly. 

It says "1:76" on the box (i.e. 20mm for us gamers) but does it work for 28mm?

This Infinity Mormaer does the "doors and windows" test.  A little small, but close enough for government work.

From a "gamers angle" any scale issues are even less noticeable. 

From the inside, the windows are actually at a good height.

This 1:48 Cromwell, whilst big, isn't too outsized.  However it does grate on me slightly more than the infantry model. A  1:56 scale vehicle would doubtless "fit" better.

Verdict: Success!

Whilst I'd be hesitant to use small 1:76 buildings (such as woodsheds or even smaller cottages), and they would be best in a vehicle-free game (I'm thinking my upcoming French & Indian Wars project), these farmhouses definitely support 28mm.  I'll be buying more.

A flatter base like a washer or those flat Renedra ones would "fit" even better than the slotta ones shown which artificially "raise" the model about 20cm or so in "scale" terms. 

MDF a.k.a. "Cardboard Crack"
What is with the price of laser-cut MDF terrain these days? It's more expensive than resin terrain now.  A huge sheet of MDF is only a few dollars at the local hardware store, so raw materials can't be the issue. Perhaps the laser-cutter machines are powered by pure unobtainium? 

Sarissa Precision is one of the more reasonable companies.  But I bet I could make this $35 building from a $2.50 MDF sheet. That's a hell of a markup.

Heaven forbid they spray paint it first.  Yes, it may look completely artificial and they only use the most basic of colours, but the paint they use apparently contains gold leaf. Or perhaps cocaine.  
This 4Ground building has been spraypainted lovingly covered in pure unobtainium.  That's right - $155 for what is effectively glorified cardboard.  I need to get a Kickstarter going to buy me a laser cutter.  It seems like a licence to print money!

So despite the recent popularity of MDF terrain (and as someone who owns a complete Old West town worth of it), I''d like to "bust" a few myths...
Myth #1: MDF is cheap
Myth #2: MDF terrain is easy to store flat (it is surprisingly annoying to assemble and disassemble)

Kamis, 12 Desember 2013

Rant: PlastCraft Foam Terrain - Infinity Miniatures

Well I'm on holidays and back gaming at last after months with nose to grindstone!

But after yesterday, it feels like the gaming IS the grindstone. Allow me to elaborate....

INFINITY
Well, I got a big box of Infinity goodies in the mail, and I must say, Corvus Belli are starting to irritate me with how they are producing their "newer" miniatures.

Lazy Mold Design
The "new" miniatures have a ridiculous amount of flash - chunks from the molding process.  No wonder prices have gone up - I almost get enough leftover metal scraps to make another 28mm figure! 

Sometimes the leftover mold chunks are actually thicker than the arm, leg or weapon they are attached to, making removal tricky AND removal is never 100% "clean" even when filed/trimmed - which stands out even more starkly on such a finely-detailed mini

Here's a Nomad Sin-Eater as an typical example. I count 13 pieces of flash:
Gun/gun arm: 6 - yes, the big one near the shoulder is flash
Other arm: 1 (plus a small amount on the end of the hand I didn't count)
Legs/Base: 1 - this is fine, as most models have mold chunks on the base
Torso: 5 - the chunks on the base of the cloak are hard to remove as they are much thicker than the cloak itself

C'mon, Corvus Belli - that's just shabby.

Multi-Part Mania
The more recent mania for multi-part Infinity minis is irritating. Some have 7 or 8 pieces. That's a single 28mm figure!  I know Tamiya model kits that are less complicated. Some might argue it helps people "personalise their models" but does not hold water - many pieces are separate heads  - and in particular legs - that can only be attached one way anyway.

Furthermore, since in Infinity it is extremely unlikely ever to be more than one of a particular model on a table anyway, people can simply "customise" their models by not slavishly copying the official paint scheme for once! Unimaginative drones. Sheesh. I call this "Games Workshop" syndrome.

In addition, the "box sets" have parts for 4-6 troops just randomly thrown together in a bag.  This is a problem as only one particular arm/weapon combo will work on one particular torso, and since some torsos and weapon poses are VERY similar, it's not unusual to realise the arm you just painstakingly glued to model X actually belongs to model Y, and is in fact the only arm that fits model Y. 

Lastly - "three point" attachments (where you must glue 3 separate items simultaneously) are very annoying if you only have the default two hands.  

I must have spent 4 hours prepping a dozen Infinity models yesterday. I estimate my time spent as:

2 hours - trimming chunks of flash off models
1 hour - attaching parts that could only be fitted one way anyway
1 hours - swearing whilst calling for the wife to help me simultaneously attach two arms and a gun

Boutique Quality?
$10 for a single metal 28mm model puts the model in the "boutique" category.  I expect better worksmanship for that kind of money.

Yes, they are nicely posed and beautifully detailed.  But I just got some modern minis from Red Star/Empress Miniatures which are just as detailed, and cost $2.50 each.  And they were only 1 or 2 part models.  And they had no flash. In fact, for the $7.50 price difference Corvus Belli could hire someone to file the flash off each model individually...

PLASTCRAFT FOAM TERRAIN
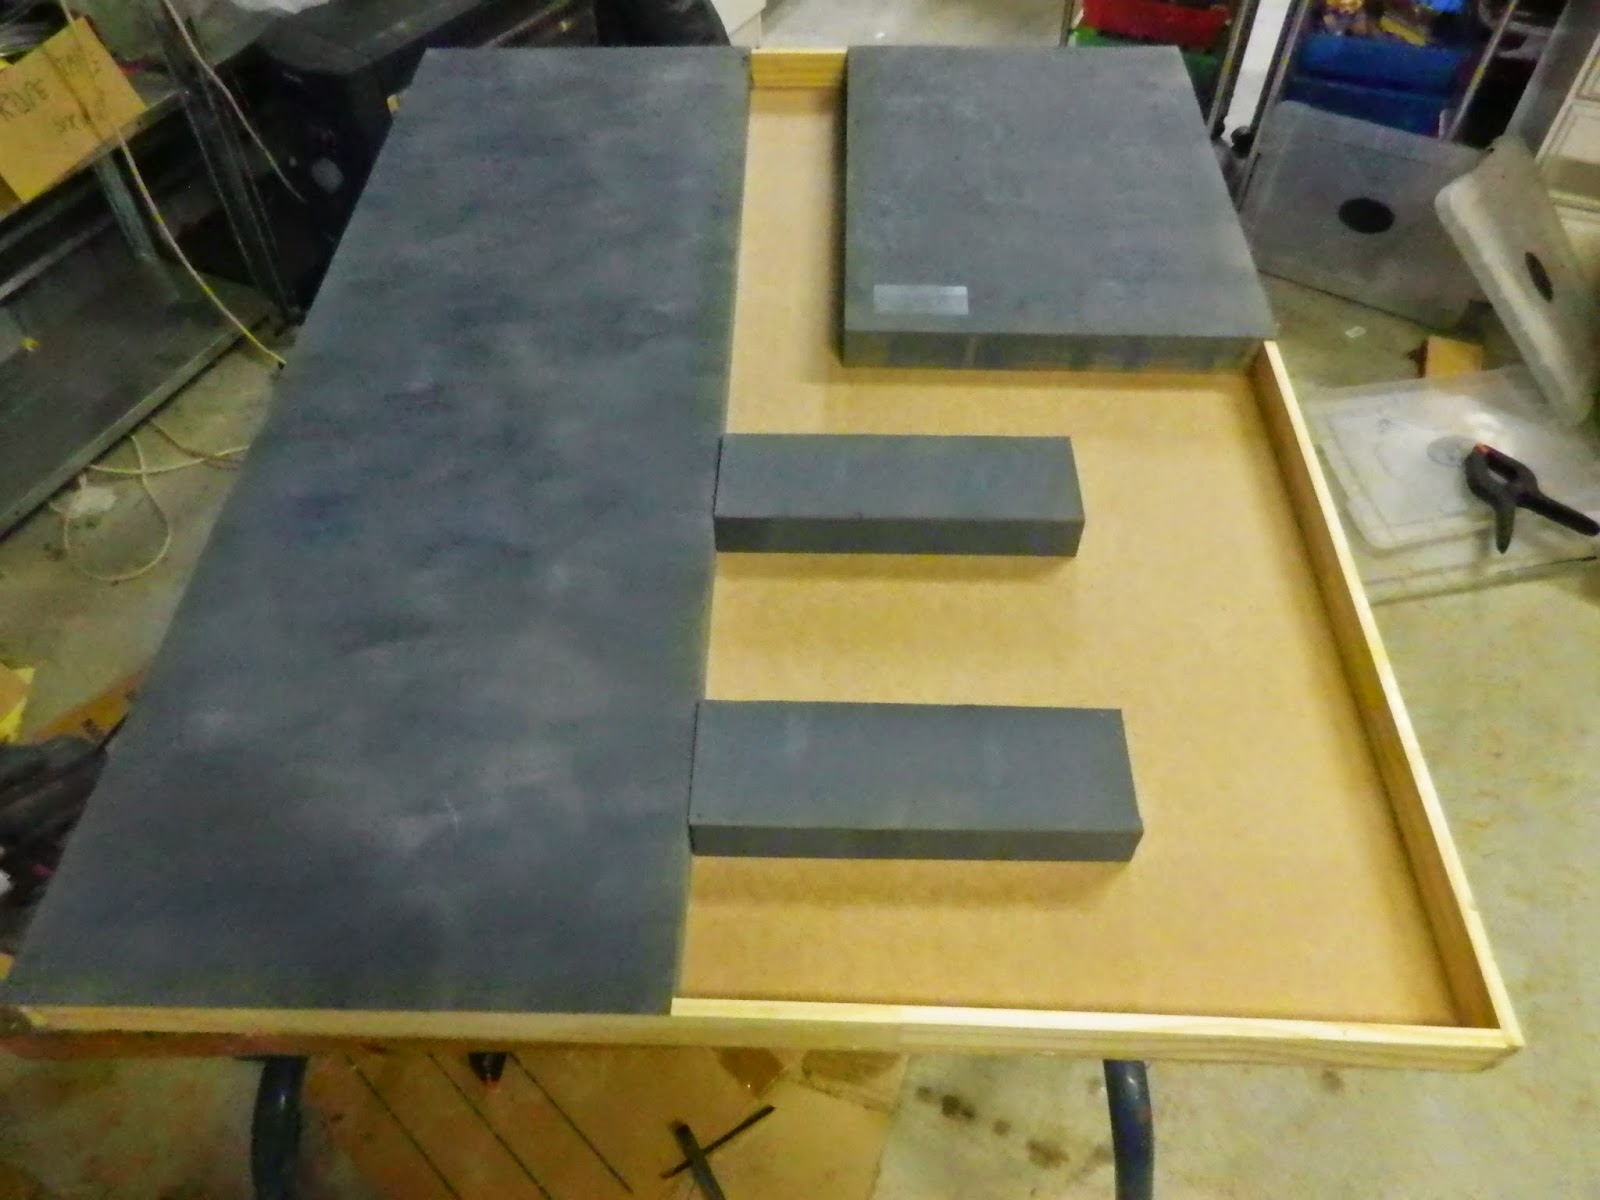
Due to the size of my order, The Combat Company sent me some free PlastCraft foam terrain. 
And I'm sure glad it was free, because if I had paid $18 RRP for it, I would have been really cheesed off.

This is what you get for $18 - two sheets of foam and some corrugated card.

Infinity-style crates, you say? Pre-cut terrain, you say?  Sounds good. I've had good experiences with both Terraclips and Dropzone Commander card terrain.

But wait, PlastCraft's definition of pre-cut differs from mine (and everyone else's).  I thought pre-cut meant the pieces were already cut out (or at least, perforated so as to snap off by hand). You know, so I don't have to cut it myself.

At first glance, I assumed you could "snap" the model out of the sheet. But no, you still have to physically cut out every bit of it with a knife.

But no, Plastcraft means "pre dented" - they've simply scored lightly intented lines to show you where to cut. And there's quite a lot of cutting. Quite detailed cutting, the sort you buy "pre-cut" terrain just so you don't have to do it.  So effectively, you are paying $18 for two small sheets of foams with some tracing on it. 

If you still think the PlastCraft stuff is a good deal, then allow me to sell you some of my "pre-cut" MDF terrain. Simply cut out the house where indicated.* (*saw required)

The Chinese have been managing to pre-cut things out of foam for years.  They'll even paint the foam, and chuck in a plastic propellor and rubber band - and only charge you $2 for it. 

OK, that's off my chest. Coming up:

Rules Tests/AARs:

Sci-Fi Fighter Submarine Rules and playtest AARs
Spaceship rules and playtest AARs
Aeronef battles using modified GQ3 rules and playtest AARs
15mm Sci fi ground troops

Terrain:
Oriental Infinity terrain
Foamboard DIY quck-and-nasty Infinity terrain (not pre-cut!)

Reviews:
Bolt Action vs Chain of Command
Ronin Oriental skirmish

Selasa, 01 Oktober 2013

Oil Rig - Cheap & Nasty Scratchbuilt Terrain

Here's my next 30 minute project. It was just random balsa pieces put on top a piece of precut MDF (I think they are meant to be drink coasters but they are very handy for terrain bases).
The rig "legs" were black plastic piping for sprinkler systems. 

 I had spare time so I thought I'd paint on a bit of detail and stay under my 30 minute limit.
Kinda regret I did though - it looks rather cartoon-y. Also making the helipad so garishly obvious precludes the use of the rig for VSF aeronef gaming...

The jets are Tumbling Dice 1:600 and are always a pleasure to paint. 

I've got plans for the oil rig for an alternate-future 1970s which involves aerial wormholes, resource-rich planets and mercenary air forces.  Think Area 88 meets Yukikaze.

Yukikaze had wormholes that appeared over Antarctica. They lead through to an alien planet which humanity invades through the wormhole.  Lots of cool dogfights. Weird incomprehensible plot.

Area 88 has a mercenary air force fighting in some un-named African/Middle Eastern country. Awesome 1970s dogfights with an annoyingly angsty, whiny, Japanese teen protagonist.

Senin, 30 September 2013

Cheap & Nasty Scratchbuilt Terrain - 30 minute Plaster Undersea Volcanoes/Thermal Vents

This technically was longer than 30 minutes due to the plaster drying but since the wife, not me, did this it counts as under 30 minutes. In fact this took me 0 minutes to make. Nice!

The wife made a base of foamboard (MDF would have been better in hindsight) and "built it up" with chunks of foamboard.  The plaster of paris step is simply like playing with mudpies. After a wait for it to dry, a very quick splash of paint later, and voila, undersea volcano!

In my submarine fighter game the heated water from the thermal vents will interfere with targeting and missile locks, providing "cover" of sorts

Apart from replacing the foamboard base with MDF, the main other change would be to touch up the paint job a bit. Since it took me 0 minutes to build, I don't care, though!